Solving the 5x5x5 (Professor) Cube
By Burjo Panic
Post a Comment
Solving the 5x5x5 (Professor) Cube
These instructions can be used to solve a 5x5x5 cube, also
known as the professor cube due to its difficulty. These directions
are a graphical version of those given by Jacob Davenport.
These instructions can be used to solve a 5x5x5 cube, also
known as the professor cube due to its difficulty. These directions
are a graphical version of those given by Jacob Davenport.
Steps
Legend: Key to Symbols for the Moves
The figures in this document represent a sample cube. Although the
colors on your personal cube may be different than the figures, I feel
that the colored figures will still be helpful in solving the cube. I would
suggest matching as many colors on your cube as possible to the figures,
then making mental notes about which colors correspond between your cube
The diagrams show all six sides of the cube by pretending that mirrors
are being held up so that you may see the "hidden" sides.
The directions for what parts of the cube to turn and when are given in a
code that is relative to the current positioning of the cube. Each side
descriptor refers to a side with respect to the figure the move is referenced to.
This means that the front side can be a different color, depending on the
diagram being used. SeeMove 1 of the 3x3x3 Rubik's Cube page for
instructive diagrams to illustrate the moves.
The Letters:
The side descriptors are:
- U for the top (Upper) side,
- u for the 2nd layer down from the top (just below the upper side),
- L for the left hand side
- l for the 2nd layer in from the left hand side
- F for the front side
- f for the 2nd layer in from the front side
- B for the back side
- R for the right hand side
- r for the 2nd layer in from the right hand side
- D for the down (bottom) side
- d for the 2nd layer up from the down (bottom) side, and
- H for the horizontal center slice (between u and d).
The Numbers:
Since the lower case L: l looks like the number 1, a letter by itself
means to turn the side clockwise one quarter turn. A letter with a 2
following it means to turn the side two turns (halfway around). A letter
with an apostrophe (') means to turn the side counterclockwise one
quarter turn (a -1 can be used in place of an apostrophe, but the
apostrophe takes up less space).
- For example, U F2f2 D' Ll means to rotate the upper side
- clockwise one quarter turn, the front side and 2nd layer in from the
- front side clockwise twice (half way around), the down (bottom) side
- counterclockwise one quarter turn, and the left side and second layer
- in from the left side clockwise one quarter turn. Look directly at the
- specified side indicated to determine which direction is clockwise or
- counterclockwise.
- For the central horizontal slice H, look at the cube through the top side
- to determine the clockwise direction.
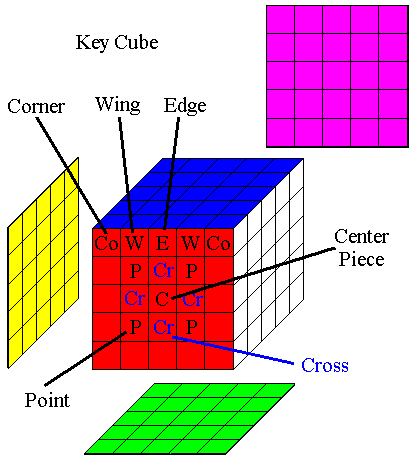
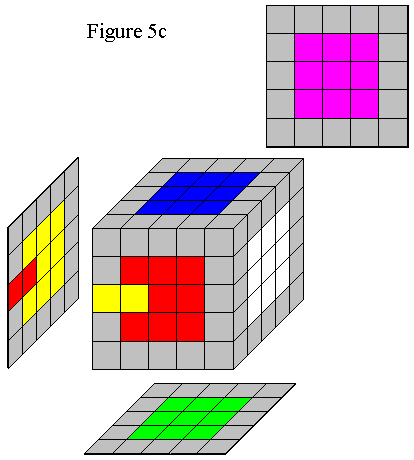
The Pieces (see the Key cube above):
- The piece in the center of each side is the center piece
- Next to each center is a "cross" piece since the cross pieces form
- a cross or + with the center piece
- Diagonally from each center piece are four "point" pieces
- Each side of the cube has five pieces along it: Corner, Wing, Edge,
- Wing, Corner
In the figures, any gray pieces represent pieces that don't matter and can
be any color. To increase clarity, I have shown a lot of colored pieces
. In most cases, the figures represent an example of the situation being
described, while the colors don't have to match perfectly.
Step 1: Solve the top points and crosses
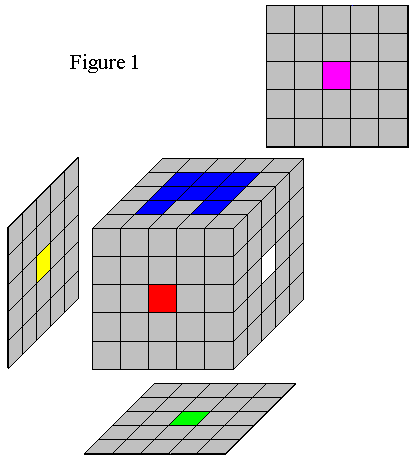
Pick a center piece to represent the first
side of the cube solved (blue in these
figures) and solve the points and crosses
on that side. One cross may be left empty
since it will be used as the "keyhole" later on.
|
Pick a center piece to represent the first
side of the cube solved (blue in these
figures) and solve the points and crosses
on that side. One cross may be left empty
since it will be used as the "keyhole" later on.
|
Step 2: Solve the bottom points
Get the four green points on the down (bottom) face in place,
using Move 2a and Move 2b as necessary.
Get the four green points on the down (bottom) face in place,
using Move 2a and Move 2b as necessary.
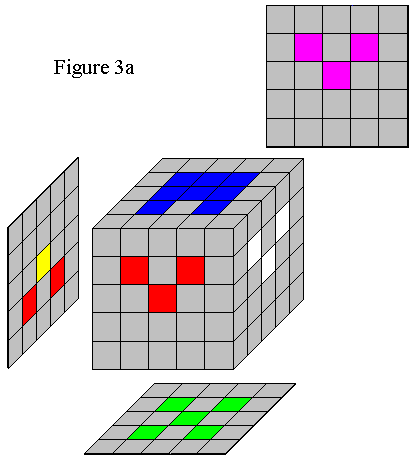
2a. To move two points into position:
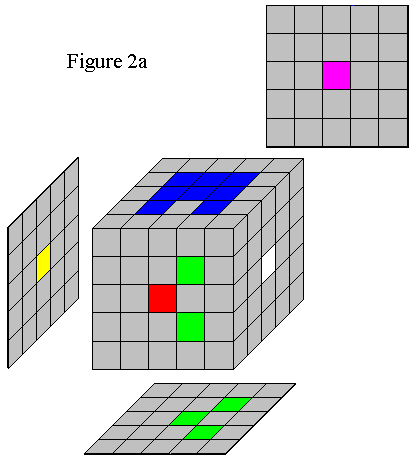
Orient the cube as shown in Figure 2a,
where the two points to be moved into
place are on the right side of the front
face while any green points already on
the down face are on the right side of
the down face, then perform Move 2a.
You will need to rotate the front side and
middle horizontal slice as necessary
to place pieces into position.
Move 2a:
R'r' D2 Rr
In words, rotate the Right side and 2nd layer in from the right side
counterclockwise one turn, the down (bottom)side two turns
(180 degrees) and the right side and 2nd layer in from the
right side clockwise one quarter turn.
|
Orient the cube as shown in Figure 2a,
where the two points to be moved into
place are on the right side of the front
face while any green points already on
the down face are on the right side of
the down face, then perform Move 2a.
You will need to rotate the front side and
middle horizontal slice as necessary
to place pieces into position.
Move 2a:
R'r' D2 Rr |
In words, rotate the Right side and 2nd layer in from the right side
counterclockwise one turn, the down (bottom)side two turns
(180 degrees) and the right side and 2nd layer in from the
right side clockwise one quarter turn.
| |
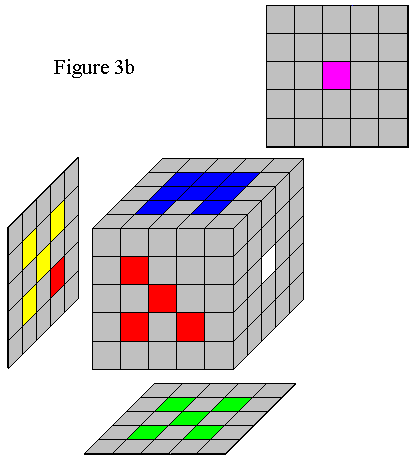
2b. To move 1 point into position:
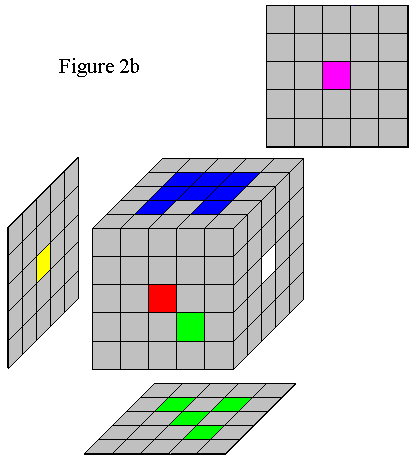
Orient the cube as shown in Figure 2b,
where the one point to be moved into
place is on the right side of the front
face while any green points already
on the down face are on the right side
of the down face, then perform Move 2b.
You will need to rotate the front side
and middle horizontal slice as necessary
to place pieces into position.
Move 2b:
R'r' D Rr
| |
Orient the cube as shown in Figure 2b,
where the one point to be moved into
place is on the right side of the front
face while any green points already
on the down face are on the right side
of the down face, then perform Move 2b.
You will need to rotate the front side
and middle horizontal slice as necessary
to place pieces into position.
Move 2b:
R'r' D Rr |
Step 3: Solve the remaining 16 points (on the sides)
- Solve the remaining 16 points on the four sides.
- Accomplish this using Dd moves (bottom two layers)
- along with F (front side) moves.
First, position the top 8 points along the 4 sides:
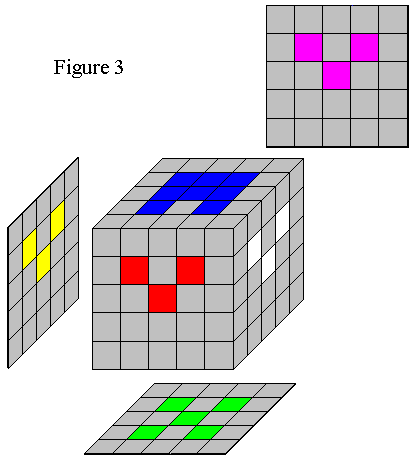
Rotate Dd freely to get Points next to
their centers, then F to put the points
up to the upper layers, yielding Figure 3.
Now use Moves 3a and 3b as needed.
- Solve the remaining 16 points on the four sides.
- Accomplish this using Dd moves (bottom two layers)
- along with F (front side) moves.
First, position the top 8 points along the 4 sides:
| | Rotate Dd freely to get Points next to their centers, then F to put the points up to the upper layers, yielding Figure 3. Now use Moves 3a and 3b as needed. |
3a. If the upper layer already has correctly placed points:
Move 3a:
L2 D'd' L2 Dd
| |
Move 3a:
L2 D'd' L2 Dd |
3b. If a face has 3 solved points:
Move 3b:
Dd F' D'd'
| |
Move 3b:
Dd F' D'd' |
Step 4: Complete the top and bottom crosses
- Complete the Blue and Green crosses. Pretend the cube is a 3x3x3,
- ignoring the outside edges. Insert pieces into the bottom via the
- keyhole using Move 4a. During this process, it's all right if the
- horizontal center pieces move around.
- When the bottom is completed, finish the top using Move 4b to get
- the last piece into position.
4a. To insert a piece into the bottom:
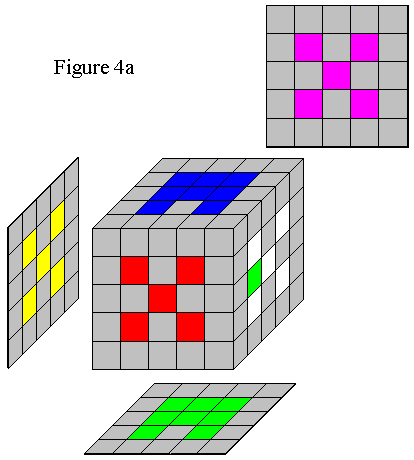 |
Move the piece to the right hand side
by rotating H (the central, horizontal slice)
, then rotate the right hand side, bottom,
and top until it looks like Figure 4a.
Now perform move 4a.
Move 4a:
H' F'f' H Ff |
4b. To complete the top (fill in the keyhole):
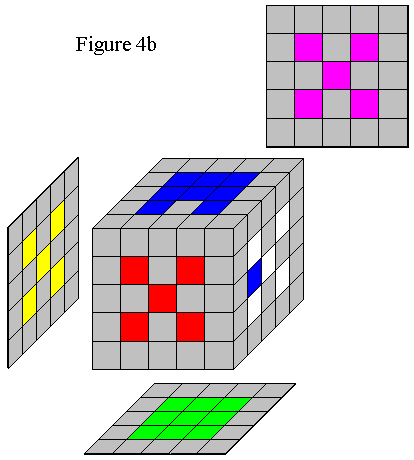 |
Move 4b:
Ff H' F'f' H' Ff H F'f' H |
Step 5: Complete the 16 remaining crosses
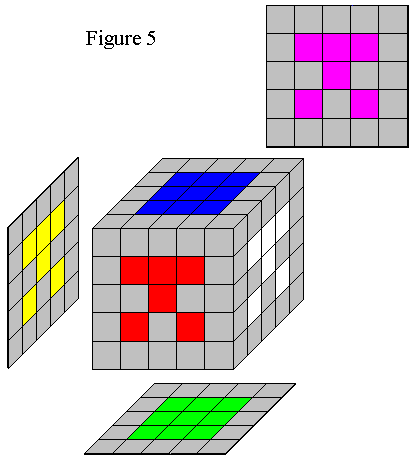 | First complete the upper cross piece of each side using H and F moves, giving the cube in Figure 5. |
- Now use Move 5a to rotate eight of the equator pieces (swapping
- between opposite faces) or Move 5b to rotate between adjacent pieces.
- At times you will have the situation of having to swap only two
- Crosses with each other, rather than doing two swaps at the
- same time. Move 5c will succeed in swapping the two pieces.
5a. To exchange the location of eight of the equator
pieces (Useful for symmetrically scrambled cubes):
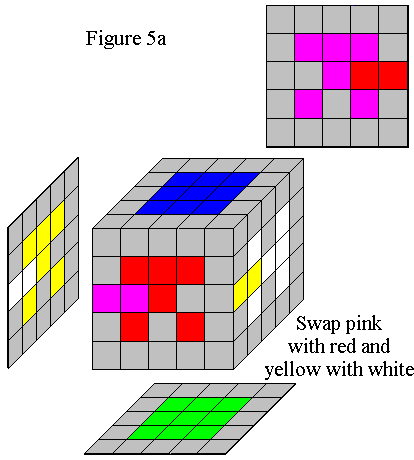 |
Move 5a:
F2f2 H F2f2 H' |
5b. To swap adjacent pieces (more useful for highly
scrambled cubes):
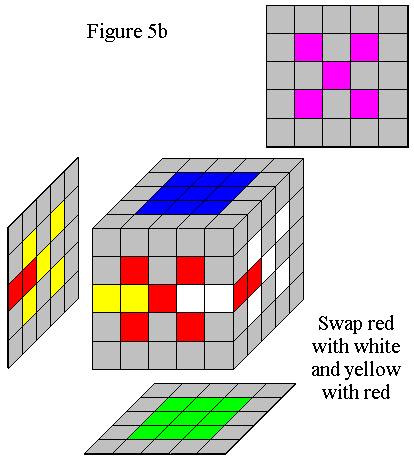 |
Move 5b:
H L2l2 H' Ll H' Ll H'
L2l2 H Ll H Ll
Note: In this move, "Ll" indicates
capital L and lowercase "ell"; thus "Ll" means
to turn both the left hand side and
the 2nd layer in from the left hand
side one quarter turn.
|
5c. If only two pieces remain to be swapped:
 |
Move 5c:
U'u' R' then Move 5b then R Uu |
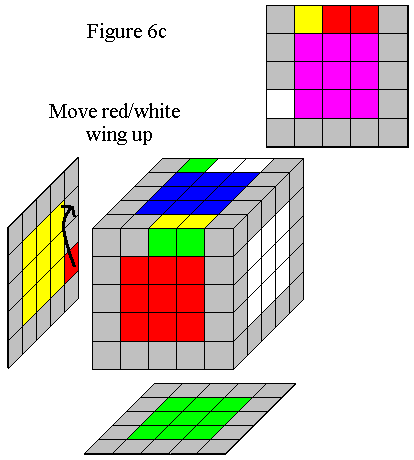
Step 6: Associate wings with their appropriate edge pieces
- Use Move 6 to join wings with their appropriate edge piece When doing this
- move, be sure that the wing piece at the
- back of the second row of the left side does not already match it's neighboring
- edge. If it does, place a different wing
- piece on the left side so as to not mess it up.This process will take quite some
- time. After you have associated a few of the wings and edges, begin
- to pay attention to the
- movement of the piece from the back-left of the cube to the back-top
- of the cube, trying to align the piece with the top back edge.
- About 50% of the time you will get a "Parity Problem", meaning tha
- t you'll have either two or four wings left to position. Move 6a will not
- work in this situation, since it moves three pieces. Instead, use
- Move 6d to fix the parity problem.
- Moves 6b and 6c are other useful moves for orienting pieces during this process
6a. To associate two wings with their appropriate edges
(on the left side):
 |
Move 6a:
Ll F' L F L'l' F |
Note: A very similar move performs the mirror image of Move 6a.
This move can be used to associate two wings with their appropriate
edges on the right side:
 |
Mirror of Move 6a:
R'r' F R' F' Rr F' |
6b. To move a wing from one side of the back to the other:
 |
Move 6b:
B L' D' B2
Remember, B means the back side
and D means the down side
|
6c. To move a wing up to position it for Move 6a:
 |
Move 6c:
B' R' B L' D' B2 R B
This is B' R' then Move 6b then R B
|
6d. To fix a Parity Error situation:
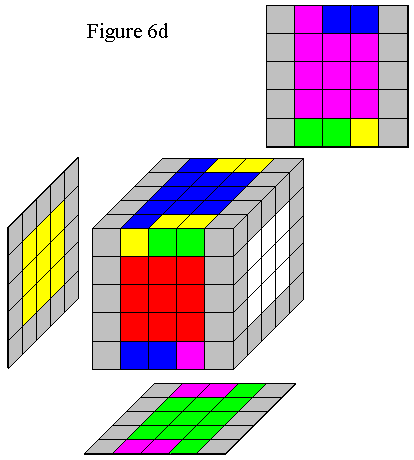 |
Move 6d:
Rr U2 Rr U2 Rr U2 Rr U2 Rr U2
This is simply Rr U2 five times.
|
6e. Another parity Error situation occurs when one edge
(and one edge alone) has it's two wings flipped, yet the
other 11 edges are all solved.
This move should fix this situation (contributed by David Bandel)
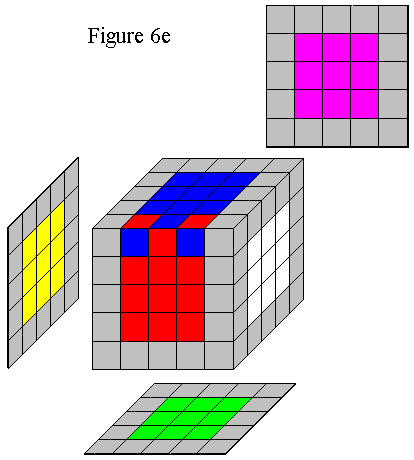 |
Move 6e:
Rr Rr B2 U2 Ll U2 R'r' U2 Rr U2 F2 Rr F2 L'l' B2 Rr Rr
Remember, B means the back side
|
6f. This move will flip 2 wings on the left and one wing on the right
(contributed by Miro Karosu)
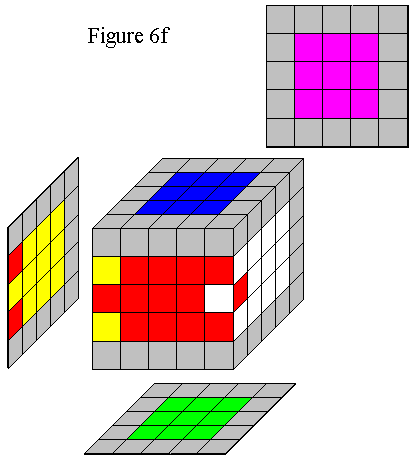 |
Move 6f:
H F U F' L F' L' F H' |
6g. This move will swap 1 edge on the front top with its
opposite edge on the front back
(contributed by Miro Karosu)
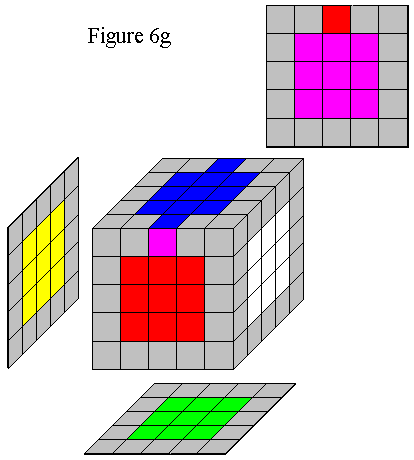 |
Move 6g:
R2r2 B2 R'r' U2 R'r' U2 B2 R'r' B2 Rr B2 R'r' B2 R2r2 B2 U2
Remember, B means the back side
|
6h. This move will swap 1 wing on the top with its opposite
wing on the top
(contributed by Miro Karosu)
 |
Move 6h:
L'l' U2 L'l' U2 F2 L'l' F2 Rr U2 R'r' U2 L2l2 |
Step 7: Solve the 3x3x3
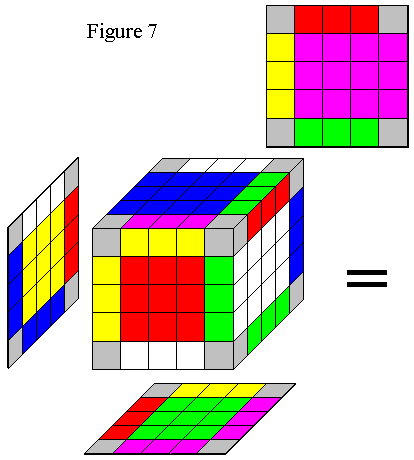 |  |
Use your favorite 3x3x3 solution to solve the cube, since the edges and
wings act like the single edge pieces of the 3x3x3, the corners directly
correspond to the corners, and the centers, crosses, and points
correspond to the center pieces of the 3x3x3, as shown in Figure 7.
 Cube)
Post a Comment for "Solving the 5x5x5 (Professor) Cube"